
OMG!! I just can’t believe my middle niece is 10!!! Where does the time go???
I wanted to make a fairy/magical/mythical card for her (because she won’t believe in the magic for much longer… [cue ‘Age of Not Believing’ from Bedknobs and Broomsticks running through my head]) so I got out my Tonic Studios fairy collection. I’ll be damned if this was the first die set the TODO really struggled with, I just could not get the dies to cut properly, I won’t lie I was in dispair!! Then I thought ‘I’ll just try a metal shim’ and thank the Gods, it worked!!
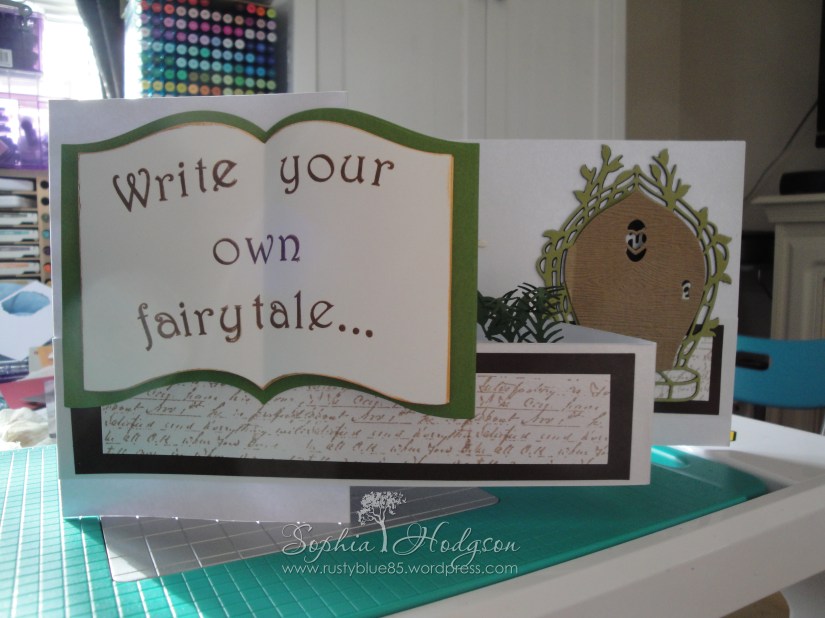
I saw the Tonic Studios YouTube ‘How to make a z-fold pop-up card tutorial‘ video and I though ‘I’ve just got to try that!!!!’ So I bought an A3 piece of Centura Pearl white hint of silver card and cut it as instructed to assemble the card base.
I then had to think about how I wanted to decorate the card… I knew I wanted a bit of a woodland scene with fairies in it, but wasn’t sure what the whole thing would be ‘about’ then I saw an inspirational quote online that said ‘write your own story’ and I thought ‘write your own fairytale’ could be the overall theme of my card. I wanted a brown/green colour scheme for the card to give the idea of the fairies in the forest, so where possible that’s what I tried to stick to.
If the theme of the card is writing then I needed a script stamp for the background. I stamped the script stamp repeatedly on Centura Pearl cardstock with Archival Ink in Coffee. Then I cut some dark brown card to mat and layer the scrip stamped sections to layer on to the Z-fold.
I die cut the second largest Presscut ‘Smaller Book‘ die from green card for my book cover, then cut 3 of the third largest die from cream card for the pages of the book. I stamped the sentiment on one of the pages using coffee Archival Ink and the Waltzingmouse Victorial Alphabet stamps. Lovely old story books have gold gilding on the pages and I wanted to re-create this so I used my Cosmic Shimmer metallic gilding polish on the edges of the ‘pages’. I used my bone folder to get a natural bend in the pages, then adhered them together with HI-Tack glue at the ‘spine’ of the book and foam tape under the pages to maintain the curve of the pages.

I’ve had the Tonic Studios ‘Fairy Door’ for AGES and not used it once, but now I wanted to use it for the big reveal. I die cut a full door and surround from green card, then I cut just the door from kraft woodgrain card (from Simon Says Stamp, but they only do the white one now) and stuck this over the top of the green card. I wanted to have the second half of my sentiment behind the door, but at the moment I only had the card base behind the door and I wanted it to be dark behind the door. I die cut the whole fairy door again from black card, stuck it behind the green die cut and used tape to hold all the little bits in the black cut-out. Because I was going to be sticking the door over the Z-fold I die cut a few more doors (just the top half) to build it up to the same height as the Z-fold so the door would be flush with the Z-fold and not bent by being stuck to multiple layers.


Most importantly – you can’t have a fairytale or a fairy door without a fairy, so I die cut Fae Ella from both black card and Neenah Classic Crest card. I coloured her in using Spectrum Noir pens, then adhered the black die cut as a drop shadow.
I die cut several foliage and leaf dies from green card to adhere to the pop-up elements to give the feeling of the forest.


Do you know anyone with a birthday around Christmas? What do you do to make their birthday cards extra special?


1 thought on “Niece’s 10th Birthday card”