
My best friend is having an afternoon tea for her birthday celebrations this year (so many friends are scattered about and some have small children so an afternoon thing means she can see as many friends as possible and they can all get wee people home in time for bed and no need for baby sitters), as she is having an afternoon tea party, I wanted to make her a tea themed card!
I bought the Sizzix ‘Tea Time‘ Bigz die and was going to use it for scrapbooking/art journalling, but it was so perfect for this project I just HAD to use it!! I was in need of a change from square and rectangular cards and wanted to create a rocker card for my base. I used the largest die from the Tonic studios ‘Celtic Dream‘ die set and cut some white Centura Pearl hint of silver card – because it is 300gsm it’s nice and sturdy to use as a base.
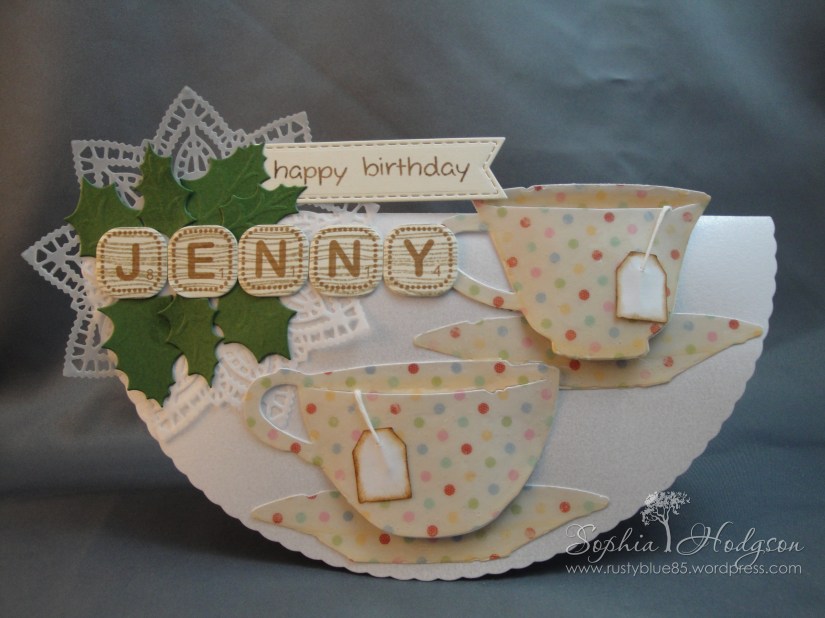
I cut the Tea Time from some patterened paper in my stash that had little coloured polka dots on it that made me think of Emma Bridgewater pottery, when I was working out the layout I wanted I realised that I would need two saucers, so I cut a second set of cups (I’m sure I’ll find another project to use them on!!) and used my bone folder to give the cups some gentle rounding and dimention. To add some extra shading to give even more feeling of dimention I added some shading with a Spectrum Noir pen where ther would be shadows. I decided to use the tags that had been cut out of the spotty paper and just use the reverse (unpatterned) side and inked the edges with Vintage Photo Distress Ink and pierced a hole with my pokey tool to get some white string through the top.
To continue with the afternoon tea theme I thought about cake, but I don’t have a die that makes a cake the right proportions for the card, and I’m too much of a perfectionist to fussy cut something (I would spend FOREVER snipping and not being happy, then realising I’d ruined it and starting again and after about 5 trys get moody and not want to finish the card, so that was best avoided!!) so instead I decided on a doily. As luck would have it I fell in love with the Marianne Creatables ‘Doily Star‘cut out of vellum on a card I saw on Pinterest (which I now can’t find on my pin boards!! D’oh!) but I thought doilies are also synonymous with tea and cake, so I grabbed my doily star die and cut out some vellum to get a really dainty, different feel to the card base.
I originally wanted a little banner with ‘happy birthday’ stamped on it to be peeking out from behind one of the cups, but it drew too much emphasis to the cups and I wanted something to draw the eye from the doily towards the cups and saucers. I die cut my banner from cream card using the Sue Wilson Creative Expressions ‘Stitched flags‘ and stamped the sentiment from Lawn Fawn ‘Hats Off to You’ using Archival Ink in coffee.
As I was looking at what I had for the card so far it was all very monotone and pale and really needed a pop of colour, I thought about some flowers over the doily but as this is a rocker card I couldn’t put too much weight on that side or it wouldn’t stand correctly. I um’d and ah’d about what to do and eventually decided that as my Christmas dies were still out on my desk that I could just cut some holly leaves for a little colour, but not much weight.


I don’t know why, but after looking at the layout again I still wasn’t happy with it and still wanted to have something more. I was wandering about personalisation and remembered my Whimsy Stamps ‘Spell it Out’ stamps and matching die. I had seen some adhesive stickers that were wood effect Scrabble tiles and I wanted to create my own version of these, so I first stamped my woodgrain in Sahara Sand ink on cream card, then stamped the letters with coffee Archival Ink and used the matching die to cut them out.
I assembled my card using Hi-Tack glue and foam tape for the cups to maintain their dimention. It was only AFTER I had assembled the card that I thought ‘it would be really good if the cups and saucers were glossy…’ so I painstakingly added glossy accents to the cups and saucers when they were attached to the card base and left it to dry overnight.
The last thing left to do was to attach the tea tags to the cups, which was fiddly!
So… here is the finished card, which rocks very nicely, I’m quite proud of the engineering feat!!
I hope you aren’t working over the festive period (or too ill) and are finding the time to get crafty! Let me know what projects you are working on!


that is so pretty!!! I love it! =)
Thank you so much Tam!!!